Homemade Fermented Vegetables bring old-fashioned kitchen craft into a modern home routine. They are simple, flavorful, and surprisingly flexible. Fresh cabbage can become sauerkraut. Carrots can turn bright and tangy. Cucumbers can become crisp refrigerator-ready pickles. The process depends on salt, vegetables, time, and clean preparation. It does not require fancy equipment. It does require attention to detail. That is where Simple Checklist for Successful Vegetable Fermentation becomes useful. The guide helps beginners move from guessing to confident fermenting. With a clear plan, the first jar feels much less intimidating.
Homemade Fermented Vegetables work because salt creates the right environment. Good bacteria thrive when vegetables stay submerged in brine. Unwanted microbes struggle when salt levels and cleanliness stay consistent. The vegetables slowly transform as fermentation develops flavor. Sourness builds gradually. Texture softens slightly while staying pleasant. Color often deepens. Aroma becomes tangy and fresh. A home fermentation checklist keeps each step organized. It helps you remember washing, cutting, salting, weighing, storing, and checking jars.
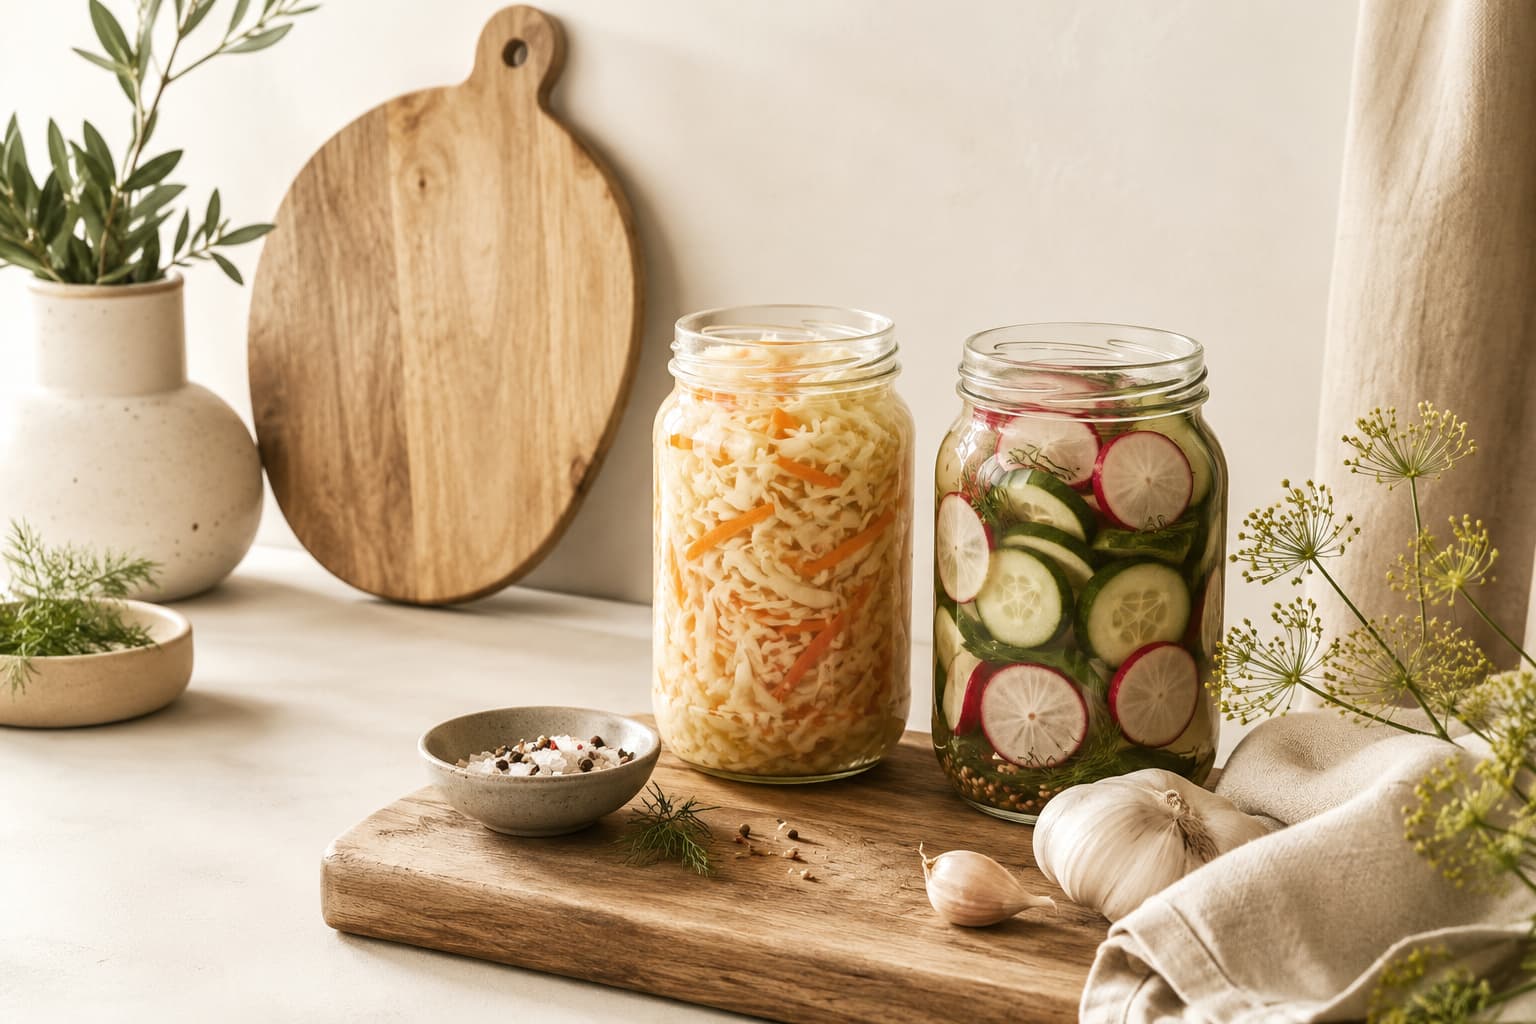
Homemade Fermented Vegetables begin with fresh produce. Firm vegetables usually ferment better than tired ones. Cabbage, carrots, radishes, green beans, cauliflower, and cucumbers are common beginner choices. Avoid bruised pieces when possible. Trim damaged areas before packing jars. Freshness matters because fermentation does not rescue poor produce. It highlights what you start with. Smaller cuts ferment faster. Larger pieces often stay crunchier. A beginner fermentation guide helps match vegetable size, salt, and timing. That simple matching step improves early results.
Clean preparation makes fermentation feel calm. Wash jars thoroughly before filling them. Rinse cutting boards, knives, weights, and lids. Use clean hands while packing vegetables. Avoid residue from soap, grease, or old food. Fermentation does not need sterile laboratory conditions. It does need a tidy kitchen rhythm. A wide-mouth jar makes packing easier. A glass weight helps hold vegetables below the brine. A loose lid lets gases escape safely. Clean jar prep gives beginners a stronger starting point. Good preparation reduces worry once the jar begins bubbling.
Homemade Fermented Vegetables depend on the right salt balance. Too little salt may invite spoilage. Too much salt slows fermentation and tastes harsh. Non-iodized salt is often preferred because it keeps brine cleaner. Fine salt dissolves quickly. Coarse salt can work when measured carefully. Some vegetables make their own brine when massaged with salt. Others need prepared saltwater poured over them. Taste should feel pleasantly salty at the start. The brine fermentation method keeps this process consistent. Salt is not decoration. It is the structure that protects the ferment.
Flavor choices should stay simple at first. Garlic adds depth. Dill feels classic. Ginger brings warmth. Chili gives gentle heat. Mustard seeds add a savory note. Bay leaves can support texture. Black peppercorns add quiet spice. Start with one or two additions. Too many flavors can make results hard to judge. A jar of carrots with garlic and dill teaches more than a crowded blend. Fermented veggie guide ideas can help you build confidence gradually. Once the basics feel familiar, creative seasoning becomes easier.
Homemade Fermented Vegetables change quickly during the first week. Bubbles may appear after a day or two. Brine may turn slightly cloudy. The jar may smell pleasantly sour. These signs often mean fermentation is active. Keep vegetables below the liquid during this stage. Open jars carefully if pressure builds. Place jars on a plate to catch overflow. Taste with a clean utensil after several days. Move the jar to the refrigerator when flavor feels right. Safe fermenting tips help beginners understand normal changes.
Most fermentation problems come from small oversights. Vegetables rise above the brine. Jars sit in overly hot rooms. Salt gets measured casually. Tools are not cleaned well. Lids are tightened too firmly. Flavors are added heavily before basic skills develop. The good news is that these issues are easy to prevent. Keep the process visible and simple. Check jars daily at first. Trust your senses, but stay cautious. Small batch fermentation helps reduce pressure. A single jar teaches more than a crowded counter.
Homemade Fermented Vegetables become useful once they enter everyday meals. Add tangy cabbage to sandwiches. Serve carrots beside rice bowls. Spoon fermented radishes over tacos. Pair green beans with cheese boards. Use cauliflower as a sharp side dish. Keep finished jars refrigerated to slow fermentation. Use clean forks when serving. Watch texture and aroma over time. These habits protect flavor and freshness. For more help, explore fermentation basics and beginner-friendly lacto-fermentation planning. Probiotic vegetable recipes, tangy vegetable pickles, crunchy fermented carrots, and fermented cabbage recipe ideas can make the next jar feel natural. Simple Checklist for Successful Vegetable Fermentation keeps that learning process organized.

Leave a comment